I don’t know if the pattern was famous before
Ree was gifted with a pair of them, but I’m fairly sure the popularity of the Fetching Fingerless Gloves pretty much skyrocketed after they were featured on The Pioneer Woman blog!

Fetching Fingerless Gloves
Honestly – they’re a great pattern – and a wonderful way to up your confidence on items knit on dpns. Not only that – they are super quick! They take hardly any time at all. (And are a complete delight to work up in the Berroco Ultra Alpaca!!!)
Ravelry does have a number of hats that could conceivably go along with these lovely fingerless gloves, but I wanted something more beanie like – couldn’t find quite exactly what I was looking for – so I kinda made one up.
Again – super easy, super quick knit. And if you’re new to cable work – a nice easy basic repeating pattern of cables to help you cement your skill! Also great – only 46 grams of the Ultra Alpaca required to complete the hat – just shy of 100 yards. Nice, huh?
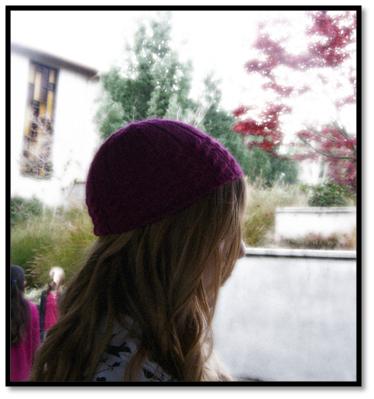
So – here it is – the Fetching Beanie, modeled by the ever lovely, delight to know, and honor to love, Miss Alayna!

Skill Level: Beginner
Materials:
- 1 skein Berocco Ultra Alpaca in Cyclamen colorway worsted 50% ultra alpaca, 50% Peruvian wool (approximately 120 yards needed)
- 1 pair size US #7 – 16″ circular knitting needles
- 1 set of US # 7 double pointed needles
- 1 cable needle
- 1 stitch marker
Technique:
- 4×1 Rib: k4, p1 every row
- C4B: slip 2 sts onto cable needle, holding to the back of work, knit next 2 sts, knit 2 sts from cable needle

Instructions:
CO 80 sts with size 7 circular needles.
Place st marker at the beginning of the row. Join sts carefully to k in the round, taking care to avoid twisting work.
Rows 1 – 6: Work 4×1 rib
Row 7: *C4B, p1, repeating from * until the end.
Rows 8 – 12: Work 4×1 rib.
Row 13: *C4B, p1, repeating from * until the end.
Rows 14 – 18: Work 4×1 rib.
Repeat Rows 13 – 18: Repeat these rows twice more.
When cable sets and 4×1 rib sets have been completed: Continue on with 4×1 rib until piece measures 6″ from CO edge.
Keeping in 4×1 rib, k next row onto dpns.
Begin decreases to shape crown:
Dec Row 1: *K4, p1, k3, ssk, repeating from * to end of the row. (73 st remaining)
Dec Row 2: *K8, ssk, repeating from * to end of row. (No more p sts, 64 sts remaining.)
Dec Row 3: K
Dec Row 4: *K7, k2tog, repeating from * to end of row. (56 sts remaining.)
Dec Row 5: K
Dec Row 6: *K6, k2tog, repeating from * to end of row. (48 sts remaining.)
Dec Row 7: K
Dec Row 8: *K5, k2 tog, repeating from * to end of row. (40 sts remaining.)
Dec Row 9: K
Dec Row 10: *K4, k2 tog, repeating from * to end of row. (32 sts remaining.)
Dec Row 11: *K3, k2tog, repeating from * to end of row. (24 sts remaining.)
Dec Row 12: *K2, k2 tog, repeating from * to end of row. (16 sts remaining.)
Dec Row 13: *K1, k2tog, repeating from * to end of row. (8 sts remaining.)
Dec Row 14: *K2tog, repeating from * to end of row. (4 sts remaining.)
Break yarn, leaving a 4″ tail. Draw tail through remaining 4 sts, pull snugly to close the top. Draw tail through the center, distributing sts around the center evenly. Weave in all ends.

Terms/Abbreviations:
|
CO |
cast on |
|
dpn |
double pointed needles |
|
k |
knit |
|
k2tog |
Knit 2 together |
|
p |
Purl |
|
rep |
repeat(s) |
|
ssk |
slip, slip, knit |
|
st(s) |
stitch(es) |